Let there be light: Making my own light table
My first order of business once I'd taken Kingi Carpenter's screen printing workshop in Toronto was to build a light table. I had decided I wanted to move ahead with photo-emulsion screen printing so I had a couple of options. I could have rigged up a table with a couple of clip lights overtop. It's a functional option but the exposure time for my screens would be 60 minutes which is a long time when you're making multiple screens. I settled on the alternative: building a light table of my own.
I happened to be visiting my dad later that month and when I mentioned I had been thinking of building a table for my new business, he said "well hell, kiddo, let's build you one now!" I love my dad. Kingi has a book called Silkscreen NOW that laid out everything we would need.
- 24"x48" fluorescent ceiling-light fixture (one of those big plant lights)
- Four 48" long, 40-watt uv fluorescent, ultra-violet bulbs model code f40/350bl
- 24"x48" piece of 5mm/1/4" glass (with sanded edges)
My dad had a spare ceiling-light fixture from when he used to grow seedlings... and pot. Did I mention I love my dad? The bulbs and the glass weren't available at Home Depot so we put that off and came up with a design for the table. Because we have limited space in our apartment, I wanted to create a light table that could double as a printing table. It complicated things a little but it was worth it. I wish I'd taken a picture of the design. The process was akin to writing lyrics on a napkin.
We went to Home Depot in the morning, bought the necessary supplies, worked through the afternoon and by the end of the day I had a rough but functional light table. All I was missing were the bulbs, the glass, and a pad to turn it into a print table.
The glass I got from Jacobs Hardware on Queen St. in Toronto. This was one of the suppliers that Kingi had given us at the end of the workshop and I'm so glad she did. I only paid around $50. The bulbs I ended up ordering off of Amazon.
For the pad, I grabbed a big piece of canvas from Home Depot, roughly twice the depth of my table, a 1" piece of carpet under padding from a carpet store, cut to the size of the table top, a package of grommets from the land of fabric (a.k.a. Fabric Land), and a couple of bungees to keep it in place.
Et voila.
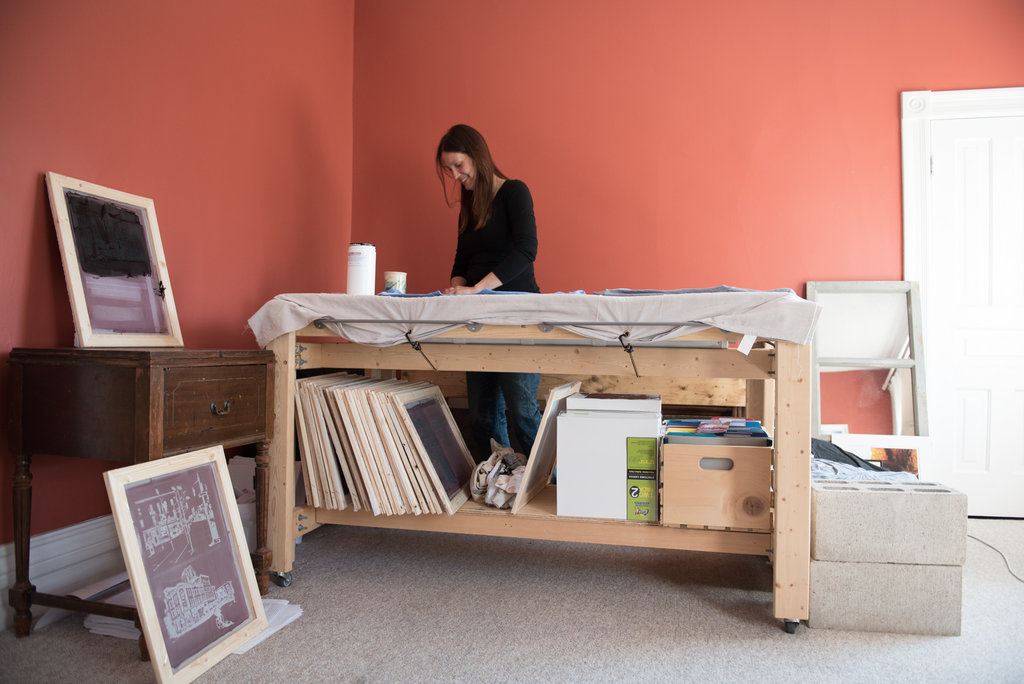
Photo cred: Sylvia at five|one|nine photography
Exposure time is around 3.5 minutes, though I'm still playing with exposure a bit. It's small once you get into printing a whack of shirts and I wish that bottom rack was just a liiiiiitle bit lower if I were to do it again, but the casters were a moment of brilliance especially given the limited space. I'm constantly moving it around. Oh and those bars on the sides are... useless. I had a few kitchen-y things lying around from our old apartment and was trying to put them to good use. You can't see it here but I added one of those magnetic knife holders onto the end of the table. That, as it turns out, was ingenious. I keep my scissors and staple gun stuck on there for easy access.
I imagine someday when I have more space, dad and I will design table 2.0 but for now this beauty does the job. I haven't named it yet, but if I did it'd be something like Betsy. Or Gertrude. A sturdy ol' girl.